3 way switch wiring allows you to control a single light fixture from two different locations, making it one of the most practical electrical setups in modern homes. Whether installed in staircases, hallways, or large rooms, this configuration improves convenience and safety. Understanding how it works not only helps with proper installation but also prevents common wiring errors that can cause malfunction or electrical hazards.
Understanding How a Two-Location Lighting Circuit Works
A standard light switch controls a fixture from one location. In contrast, a dual-location switching system uses two switches connected through traveler wires to manage the same light. Instead of a simple on-off loop, this setup creates a continuous electrical path that changes depending on the position of each switch.
Each switch has three main terminals:
- One common terminal
- Two traveler terminals
When either switch is toggled, the electrical path changes, turning the light on or off regardless of the other switch’s position. This design explains why the switch positions don’t always match the light status.
Understanding this internal logic is essential before attempting any 3 way switch wiring project, especially when troubleshooting.

Why Homeowners Choose This Setup
Controlling a light from two points is more than a luxury—it’s often a necessity. Consider walking upstairs in the dark. Turning on the light at the bottom and switching it off at the top improves both safety and comfort.
Here are common areas where this configuration is used:
- Staircases
- Long hallways
- Large living rooms with multiple entrances
- Garages with two access doors
- Outdoor pathways with dual entry points
Beyond convenience, proper 3 way switch wiring increases property value and modernizes lighting control.
Essential Components You Need
Before starting installation, ensure you have the correct materials. Using the wrong cable type or misidentifying wires is one of the most frequent causes of faulty operation.
Key components include:
- Two compatible three-terminal switches
- 14/3 or 12/3 NM cable (depending on circuit rating)
- Electrical boxes
- Wire connectors
- Grounding wires
The cable between switches must include two traveler wires and one ground. Depending on the wiring layout, power may enter at the first switch, the second switch, or the light fixture itself. Identifying the power source location is critical before beginning any 3 way switch wiring installation.
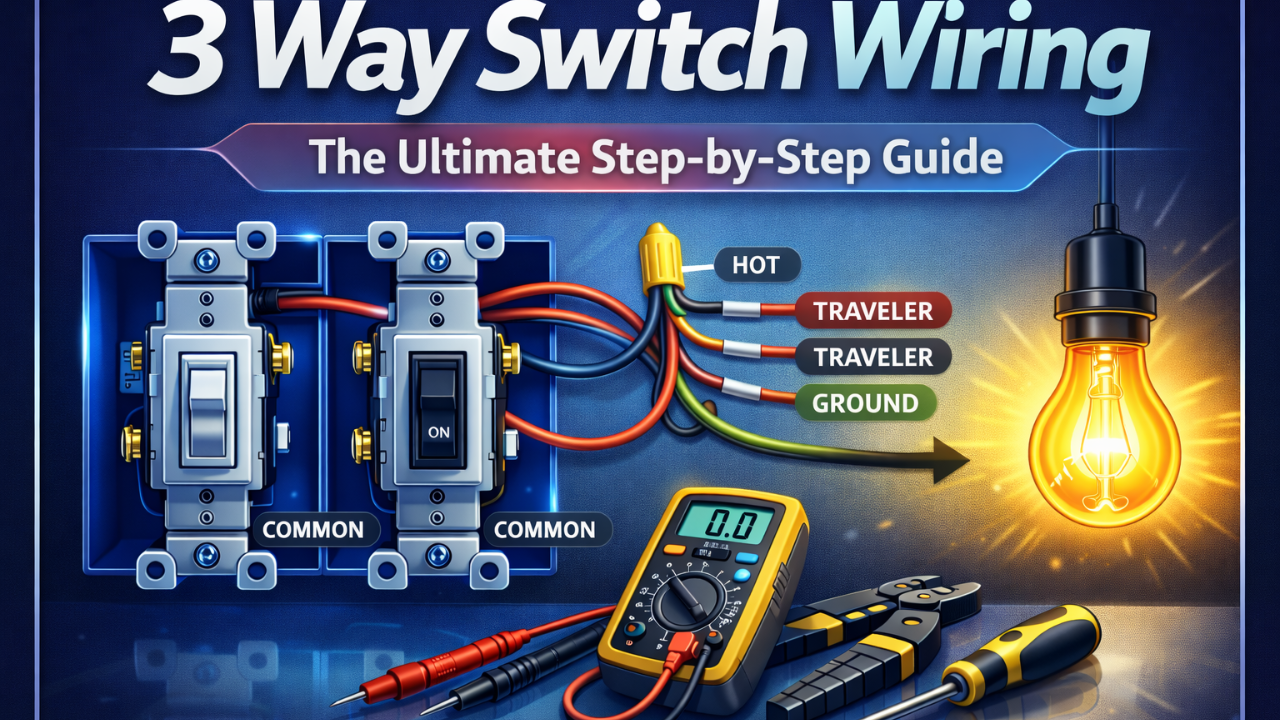
3 Way Switch Wiring Diagram Explained in Simple Terms
Although diagrams may look complex, they follow a clear logic. Power from the breaker panel connects to the common terminal of the first switch. Two traveler wires connect both switches. The common terminal of the second switch leads to the light fixture.
When both switches connect to the same traveler wire, the circuit completes and the light turns on. If they connect to different travelers, the circuit breaks and the light turns off.
Understanding this pathway helps prevent reversed connections, which are a common issue in incorrect 3 way switch wiring setups.
Step-by-Step Installation Process
Safety should always come first. Turn off the breaker and confirm the circuit is de-energized using a voltage tester.
Follow these steps carefully:
- Run the appropriate cable between both switch boxes.
- Connect the incoming hot wire to the common terminal of the first switch.
- Attach the two traveler wires to the traveler terminals.
- Connect the travelers to the corresponding traveler terminals on the second switch.
- Attach the common terminal of the second switch to the light fixture’s hot wire.
- Connect all grounds together and secure them to each switch.
After restoring power, test the switches in all possible combinations. Proper 3 way switch wiring ensures the light responds correctly regardless of which switch is toggled.
Common Mistakes That Cause Electrical Problems
Even small wiring errors can create frustrating issues. Misidentifying the common terminal is one of the most frequent mistakes. On most switches, the common screw is darker than the traveler screws.
Other common problems include:
- Mixing up traveler wires
- Loose wire connections
- Incorrect grounding
- Using the wrong cable type
- Overcrowding electrical boxes
Faulty 3 way switch wiring may cause lights to work intermittently or not at all. In worst cases, overheating can occur due to poor connections.
Troubleshooting a Non-Working Circuit
If the light does not operate correctly after installation, systematic testing is required. Begin by turning off power and inspecting connections.
Check the following:
- Ensure the common wire is on the correct terminal.
- Confirm traveler wires are not swapped with the common.
- Inspect wire nuts for tight connections.
- Verify the fixture bulb is functioning.
A multimeter can help identify whether voltage is reaching each switch. Most 3 way switch wiring issues stem from terminal misplacement rather than defective switches.
When to Call a Licensed Electrician
While many homeowners successfully complete this installation, certain situations require professional help. If aluminum wiring is present, or if the circuit includes additional switches (such as four-way configurations), expert evaluation is recommended.
Complex layouts, multi-gang boxes, or older homes with outdated wiring systems increase installation risks. Professional electricians ensure code compliance and safe 3 way switch wiring practices.
Electrical codes vary by region, and adherence is crucial for inspection approval and insurance protection.
Safety Considerations You Should Never Ignore
Electricity can be dangerous when handled improperly. Always switch off the breaker and verify power is disconnected before touching wires. Use insulated tools and follow manufacturer instructions.
Key safety reminders include:
- Never rely solely on wall switches to cut power
- Avoid backstabbing terminals; use screw connections
- Secure cables properly inside electrical boxes
- Ensure all grounding wires are connected
Safe 3 way switch wiring protects both your home and your family from preventable hazards.

Upgrading to Smart Switch Alternatives
Modern smart switches can replace traditional configurations while maintaining dual-location control. Some smart systems use wireless communication between switches, reducing the need for traveler wires.
However, many smart models still require proper 3 way switch wiring compatibility. Always verify that your chosen device supports multi-location switching before purchase.
Smart upgrades add automation, scheduling, and remote control through mobile apps, increasing convenience without sacrificing functionality.
Understanding Code Compliance and Load Capacity
Electrical installations must comply with national and local codes. The wire gauge must match the breaker rating—typically 14-gauge for 15-amp circuits and 12-gauge for 20-amp circuits.
Improper wire sizing or overloaded circuits can create fire hazards. Correct 3 way switch wiring includes proper cable selection, secure mounting, and adequate box fill capacity.
If you are unsure about load calculations or code requirements, consult a licensed professional before proceeding.
Final Thoughts on Installing Dual-Location Lighting Control
Mastering 3 way switch wiring provides both practical benefits and technical confidence. From improving hallway visibility to enhancing home safety, this setup remains a foundational electrical skill. When installed correctly, it operates seamlessly for years with minimal maintenance.
Approach the project with preparation, patience, and respect for safety standards. If the configuration seems confusing, take time to study the circuit logic before making connections. A clear understanding prevents costly mistakes and ensures reliable performance.
By following best practices and maintaining code compliance, homeowners can confidently implement 3 way switch wiring as a long-term lighting solution that combines convenience, safety, and efficiency.
Also Read: Drawer Locks: The Ultimate Guide to Secure, Smart, and Reliable Protection for Every Space

One thought on “3 Way Switch Wiring: The Ultimate Step-by-Step Guide to Avoid Costly Mistakes”
Comments are closed.