Thermostat wiring is the foundation of how your heating and cooling system communicates, controls temperature, and maintains indoor comfort efficiently. When done correctly, it ensures accurate readings, smooth system operation, and long-term reliability, while poor connections can lead to inconsistent temperatures, system errors, or even equipment damage. This guide breaks down the process in a clear, practical way so homeowners and DIY learners understand what matters, what to avoid, and when to seek professional help.
Understanding How a Thermostat Communicates With HVAC Systems
At its core, a thermostat acts as a control hub that sends low-voltage signals to your HVAC components. These signals tell the system when to heat, cool, or circulate air. The wires serve as messengers between the control board and the thermostat, each assigned a specific function based on color and terminal labeling.
Most residential systems operate on 24-volt power supplied by a transformer. This low voltage is safer than line voltage but still requires careful handling. Knowing how signals flow helps you understand why correct connections are critical for system accuracy and energy efficiency.
Modern smart thermostats add complexity by using additional connections for constant power, Wi-Fi communication, and advanced features. Even so, the underlying communication principles remain the same across traditional and smart models.

Common Thermostat Wire Colors and What They Mean
Wire colors provide a helpful guide, but they are not always guaranteed. Installers sometimes deviate from standards, especially in older homes. That is why terminal labels matter more than color alone.
Typically, the red wire carries power from the transformer. White controls heating, yellow controls cooling, and green manages the fan. Blue or black is often used as a common wire that completes the power circuit for digital or smart thermostats.
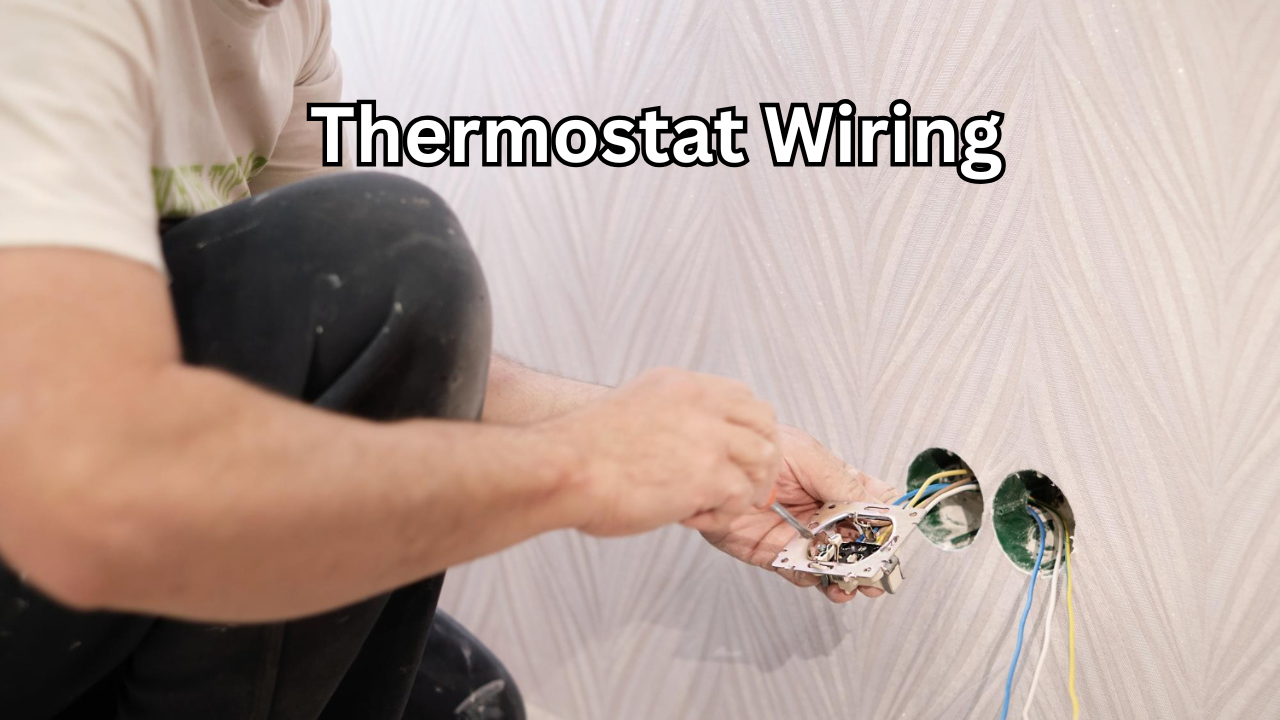
Before disconnecting anything, documenting existing connections is essential. Taking a photo or labeling wires prevents confusion during reinstallation and reduces the risk of incorrect hookups.
Thermostat Wiring Basics Every Homeowner Should Know
Before working on any connections, power to the HVAC system must be turned off at the breaker. This step protects both you and the equipment. Even low-voltage systems can short circuit if wires touch improperly.
When examining connections, look for secure terminal screws, intact insulation, and no exposed copper beyond what is necessary. Loose connections can cause intermittent operation that is difficult to diagnose later.
Thermostat wiring should never be forced into terminals. Each wire should sit comfortably and firmly, ensuring a stable electrical path without strain or bending that could weaken the conductor over time.
Thermostat Wiring for Smart and Programmable Models
Upgrading to a smart thermostat often raises questions about compatibility. Many smart models require a dedicated common wire to supply continuous power. Homes without one may need an adapter or professional modification at the control board.
Some systems allow repurposing an unused wire, while others require pulling new cable. Understanding your system type, whether conventional, heat pump, or dual-fuel, helps determine what is possible without extensive changes.
Manufacturers provide wiring diagrams tailored to their devices, and following those instructions precisely is more important than relying on color conventions. Careful setup ensures accurate learning algorithms, scheduling, and remote access features function properly.
Troubleshooting Issues Related to Thermostat Wiring
Problems caused by wiring mistakes often appear as inconsistent temperatures, systems that will not turn on, or HVAC units that run continuously. Checking connections is one of the first diagnostic steps professionals take.
Loose terminals, crossed wires, or missing common connections are frequent causes of malfunction. In some cases, corrosion or aging insulation can interrupt signals, especially in humid environments.
If a system behaves erratically after a thermostat replacement, revisiting the connections against the manufacturer’s diagram often reveals the issue quickly. This approach saves time and prevents unnecessary component replacement.
Safety Tips When Handling Thermostat Connections
Although these systems use low voltage, safety practices still matter. Always shut off power before touching wires, and use insulated tools designed for electrical work.
Avoid stripping too much insulation, as exposed copper can contact adjacent terminals and cause shorts. Keep wires neatly arranged to prevent pinching when mounting the thermostat base.
If you encounter unfamiliar terminals, damaged cables, or complex multi-stage systems, stopping and consulting a professional is the safest option. Knowing your limits protects both the equipment and your investment.
Thermostat Wiring in Older Homes
Older homes may present unique challenges. Some systems use outdated color schemes or lack sufficient conductors for modern thermostats. Others may have spliced or extended cables hidden behind walls.
In these situations, careful inspection and documentation are crucial. Testing wires with a multimeter can confirm function when labels are unclear. However, this step requires confidence and basic electrical knowledge.
When modernization is desired, running new cable can future-proof the system, allowing compatibility with advanced controls and efficiency upgrades without repeated modifications.

When to Call a Professional HVAC Technician
DIY work is suitable for straightforward replacements, but not every scenario is ideal for self-installation. Complex zoning systems, heat pumps with auxiliary heat, or commercial-grade equipment often require expert handling.
Professionals can quickly identify compatibility issues, ensure code compliance, and optimize system performance. Their experience reduces the risk of hidden errors that may not appear immediately but can cause long-term problems.
Choosing professional help is not a failure but a practical decision when system reliability and safety are priorities.
Long-Term Maintenance and Reliability
Once installed correctly, thermostat wiring requires little ongoing maintenance. Periodic checks during HVAC servicing can catch loose terminals or insulation wear early.
Keeping the thermostat clean, free from dust, and securely mounted helps maintain accurate temperature readings. Environmental factors like humidity and vibration can affect connections over time, making occasional inspection worthwhile.
Proper installation and mindful maintenance extend the life of both the thermostat and the HVAC system it controls.
Conclusion: Why Proper Connections Matter
Thermostat wiring plays a critical role in comfort, efficiency, and system reliability. Understanding how connections work, following best practices, and respecting safety guidelines ensures your heating and cooling system responds accurately to your needs. Whether you are replacing an old unit or upgrading to a smart model, careful attention to detail delivers dependable performance and peace of mind for years to come.
Also Read: Bed Risers: The Smart and Powerful Way to Upgrade Your Space
One thought on “Thermostat Wiring: The Complete Positive Guide for Safe, Accurate Installation”
Comments are closed.