Why Cleaning Your Shower Head Matters
How to Clean Shower Head Vinegar – Over time, shower heads collect mineral deposits, limescale, and bacteria that can reduce water pressure and affect water quality. This buildup happens faster in areas with hard water, where minerals like calcium and magnesium accumulate inside the small holes of the shower head. When this happens, the water flow becomes uneven, sprays in different directions, and sometimes even smells unpleasant.
Cleaning your shower head with vinegar is one of the simplest and most effective methods to remove these deposits. Vinegar naturally dissolves mineral buildup without damaging most materials. It’s affordable, eco-friendly, and requires minimal effort. Regular cleaning not only improves water pressure but also helps maintain hygiene and extend the life of your shower fixture.
Signs Your Shower Head Needs Cleaning
You may not always notice mineral buildup immediately, but there are some common signs that indicate it’s time for a cleaning. One of the most obvious signs is reduced water pressure. If your shower feels weaker than usual, clogged nozzles could be the reason. Another sign is uneven spray patterns, where water shoots out in odd directions instead of flowing smoothly.
White or greenish residue around the shower head is also a clear indicator of mineral buildup. In some cases, you may even notice dark spots or mold forming around the nozzles. If your shower head makes unusual noises or takes longer to rinse soap, it’s likely time for a deep clean. Regular maintenance prevents these problems from becoming worse.
Why Vinegar Works So Well
Vinegar is highly effective because it contains acetic acid, which breaks down mineral deposits like calcium and lime. Unlike harsh chemical cleaners, vinegar is safe to use on most metal and plastic shower heads. It’s also non-toxic, making it ideal for households that prefer natural cleaning solutions.
Another advantage of vinegar is that it helps kill certain bacteria and mold that can grow inside shower heads. This improves not only water flow but also hygiene. Since vinegar is widely available and inexpensive, it’s one of the best DIY cleaning solutions for home maintenance.

Things You’ll Need Before You Start
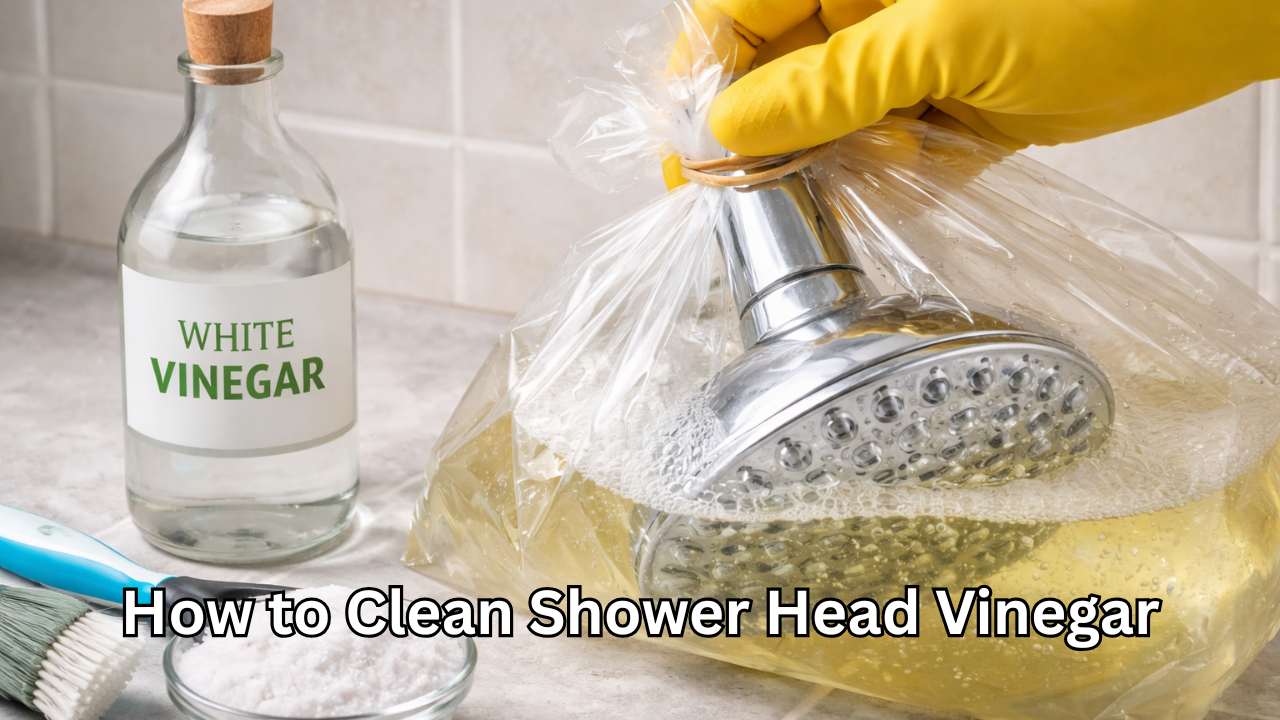
Before cleaning your shower head, gather a few basic items. You’ll need white vinegar, a plastic bag, and a rubber band or zip tie. If your shower head is heavily clogged, you may also want a soft brush, such as an old toothbrush, and a cloth for wiping. These simple tools make the process quick and efficient.
It’s important to use white vinegar instead of other types, as it’s clear and less likely to stain surfaces. Make sure the plastic bag is large enough to fully submerge the shower head. Having everything ready before you begin ensures a smooth cleaning process.
Method One: Cleaning Without Removing the Shower Head
The easiest way to clean a shower head with vinegar is by using the soak method. Start by filling a plastic bag with enough white vinegar to cover the shower head. Carefully place the bag over the shower head, ensuring all nozzles are submerged. Secure the bag with a rubber band or zip tie around the shower arm.
Let the shower head soak for at least one hour. For heavy buildup, you can leave it overnight. During this time, the vinegar dissolves mineral deposits inside the nozzles. After soaking, remove the bag and run hot water through the shower head for a few minutes. This flushes out any remaining debris.
If some holes are still clogged, gently scrub them with a toothbrush. This helps remove stubborn residue. Finally, wipe the shower head with a clean cloth to restore its shine. You should immediately notice improved water pressure and smoother flow.
Method Two: Removing the Shower Head for Deep Cleaning
For more thorough cleaning, you can remove the shower head entirely. Unscrew it carefully from the shower arm using your hands. If it’s tight, wrap a cloth around it and use pliers gently to avoid scratches. Once removed, place the shower head in a bowl filled with white vinegar.
Allow it to soak for one to two hours. For severe buildup, leave it overnight. After soaking, use a toothbrush to scrub the nozzles and remove loosened deposits. Pay special attention to the inside threads and edges. Rinse the shower head thoroughly with warm water.
Before reattaching, check the rubber washer and clean it if necessary. Screw the shower head back onto the shower arm and run water to ensure everything is working properly. This method is ideal for older shower heads or those with heavy mineral accumulation.
How Often You Should Clean Your Shower Head
Regular cleaning keeps your shower head functioning at its best. In areas with hard water, cleaning once a month is recommended. If you have softer water, cleaning every two to three months may be sufficient. However, if you notice reduced pressure or uneven spray, don’t wait—clean it immediately.
Frequent cleaning prevents stubborn buildup and makes each cleaning session easier. It also helps maintain consistent water flow and reduces the risk of bacteria growth. Making this a part of your routine home maintenance can save time and money in the long run.
Tips to Prevent Future Mineral Buildup
Preventing buildup is easier than removing heavy deposits. After each shower, wipe the shower head with a dry cloth to remove excess water. This reduces mineral residue. Installing a water softener can also help if your home has hard water.
Another helpful tip is to run hot water through the shower head for a few seconds before and after use. This helps flush out small particles. You can also perform a quick vinegar soak every few weeks to prevent clogging. These simple habits keep your shower head clean for longer.

Is Vinegar Safe for All Shower Heads
Vinegar is safe for most metal and plastic shower heads. However, some finishes like brass, gold, or nickel may be sensitive to prolonged exposure. If your shower head has a special coating, limit soaking time to 30 minutes and test a small area first.
For delicate finishes, you can dilute vinegar with equal parts water. This still removes buildup while reducing the risk of damage. Always rinse thoroughly after cleaning to avoid residue.
Common Mistakes to Avoid
One common mistake is using very hot vinegar, which isn’t necessary and can damage certain materials. Room temperature vinegar works just as effectively. Another mistake is soaking for too long, especially with decorative finishes. This may dull the surface.
Avoid using sharp tools to unclog holes, as they can damage the nozzles. Stick to soft brushes instead. Also, remember to rinse thoroughly after cleaning to remove any leftover vinegar smell.
Benefits of Cleaning Your Shower Head with Vinegar
Cleaning your shower head regularly offers several benefits. Improved water pressure is the most noticeable advantage. You’ll also enjoy a more even spray pattern, making showers more comfortable. Removing bacteria and mold improves hygiene and water quality.
Regular cleaning extends the lifespan of your shower head, saving money on replacements. It also enhances the appearance of your bathroom by removing unsightly buildup. Since vinegar is natural and affordable, this method is both cost-effective and environmentally friendly.
Final Thoughts
Cleaning your shower head with vinegar is one of the simplest home maintenance tasks that delivers immediate results. With just a plastic bag and white vinegar, you can restore water pressure, improve hygiene, and extend the life of your shower fixture. Whether you choose to soak it while attached or remove it for deep cleaning, the process is quick and effective.
By incorporating regular cleaning into your routine, you’ll prevent stubborn mineral buildup and enjoy better showers every day. Vinegar remains one of the safest, most natural solutions for keeping your shower head in top condition. With consistent care, you can maintain strong water flow and a cleaner bathroom effortlessly.
Also Read: Why Does My House Smell Musty? Causes, Fixes, and Prevention Guide


One thought on “How to Clean Shower Head Vinegar: The Ultimate Step-by-Step Guide for Better Water Flow”
Comments are closed.